EDIT 3-13-14: I’m pleased to say that there’s a better fix now than what is described on this page. If the PSE 12 Auto Analyzer is giving you problems, in the Editor go to Help>Updates and update to 12.1. You can read more about 12.1 and the Auto Analyzer here. If you did put the space in the Auto Analyzer’s name be sure to remove it before running the update. And Adobe has asked me to point out that they DO NOT RECOMMEND renaming it.
Since it’s Halloween, this is a good day to discuss Adobe’s own vampire zombie: the Photoshop Elements 12 Auto Analyzer.
If you’ve used a recent version of Photoshop Elements, you may be aware that one of the Organizer “features” is something called the Auto Analyzer. Its function is to evaluate your photos for you and add what Adobe calls Smart Tags, to your photos. “Smart” in this case meaning “really-hard-to-get-rid-of”. So the Auto Analyzer may tag your photos as “high quality, in focus” or it may judge your photo to be blurry and low quality and add helpful tags to that effect.
Now if you’re a fan of the Auto Analyzer, everything is fine, but since most people don’t see this as exactly a desirable feature, the first thing they do is to turn it off, since it runs constantly in the background (even when Elements isn’t running), and it’s a real memory hog on top of everything else and can really slow things down. In previous versions of Elements, all you had to do was to go to the Organizer preferences->Media Analysis and turn it off there and it obligingly went away.
Alas, in PSE 12 that does as much good as shooting Dracula or the Wolfman with a regular ol’ bullet. It just comes back again and again. I have no idea what it’s doing when you’ve stopped it from tagging things, but if you really want to kill it, it’s not so simple now. For Windows folks, it’s not usually so much of an issue, but on a Mac it can bring your whole system to its knees. If you have a Mac that has suddenly slowed down enormously, the first thing to seek out is the Auto Analyzer. I’ll also include how to stop it in Windows, since even if it’s not making trouble you may be as uneasy as I am about processes that insist on running when you don’t know what they’re doing.
Before going through all the steps, I will say that you may be able to get away with just doing Step 4 and restarting your computer on either platform, but if that doesn’t do it, you’ll need to do everything in the list.
EDIT I’m advised by Adobe that doing this will also kill your ability to upload video to Revel from within PSE. So if that’s important to you, you probably don’t want to do this.
It also turns out that the Auto Analyzer can cause big problems with stacks and version sets in Windows. If you’ve upgraded to PSE 12 and you can’t stack and your photos aren’t saving in version sets anymore, try turning off the Auto Analyzer in Task Manager. If that fixes it, follow the steps to shut it down completely.
2nd EDIT As of March 6, 2014 Adobe has released PSE 12.1. If you removed the space from the Auto Analyzer’s name, be sure to put it back before running the update (available via Editor>Help Menu>Updates). Note that the update will reset everything pertaining to the Auto Analyzer back to where it was initially, so if you don’t want it running all the time, you will need to go back and remove it from your startup/login items and put the space back in. EDIT 3-13-14: The Auto Analyzer behaves so much better since the update that I would recommend just leaving it alone after the update unless you have a serious problem with it.
Mac
If you never once open the Organizer, you won’t need to do any of this, but just looking around in the Organizer one time is enough to start things going.
1. Go to Elements Organizer->Preferences->Media Analysis and turn off everything circled here.

That should be enough to stop it, but it isn’t.
2. Go to Applications->Utilities->Activity Monitor and select ElementsAutoAnalyzer in the list of running processes, and kill it by clicking the red Quit Process button at the top of the window:

Now you would think that should do it, wouldn’t you? And it’s true that as long as you don’t open the Organizer, log out of your OS X account and back in, or restart your Mac, it’s okay. But do any of those things, and back it comes again. So how do you really kill it dead?
3. First of all, Adobe has been really sneaky about this. It put the Auto Analyzer into your Login Items (really unconscionable, in my opinion). So go to System Preferences-> Users & Groups, and click on your name in the list on the left side of the window, then on Login Items and you’ll see this:

Select ElementsAutoAnalyzer in the list and click the Minus button at the bottom of the window.
Now you would think that would do it for sure, wouldn’t you? But nooo. You’re good to go as long as you never open the Organizer again, but as soon as you do, the Auto Analyzer, like the true Undead that it is, comes right back and puts itself back into your Login items again. So how can you drive a stake through its evil heart? Here’s the trick:
4. Go to your Applications folder and right-click (control-click if you have your mouse set up for one button) Adobe Elements 12 Organizer and choose Show Package Contents from the popout menu. You will see a folder called Contents. Open that and you’ll see ElementsAutoAnalyzer in the list of contents. Click its name and insert a space in it somewhere:

That’s all you need to do to keep the rest of the program from finding it and starting it up again. Remember that you did this, and go back and delete that space before you try to uninstall PSE, though, to make sure the uninstaller can find everything. So far I haven’t heard of anyone having problems as a result of doing this–Organizer works just fine without it, but if you do have trouble, the answer is just to delete the space.
Windows
The process is similar in Windows.
1. Go to Edit->Preferences->Media Analysis and uncheck everything:
2. Press Ctrl+Alt+Delete and open Task Manager and stop the Auto Analyzer there.
3. Go to Run and enter MSCONFIG and run that. In the Startup tab, turn off the Auto Analyzer:

4. Go to C:\Program Files [Program Files (x86) for 64-bit systems]\Adobe\Elements 12 Organizer\CAHeadless and insert a space into the name of the ElementsAutoAnalyzer:
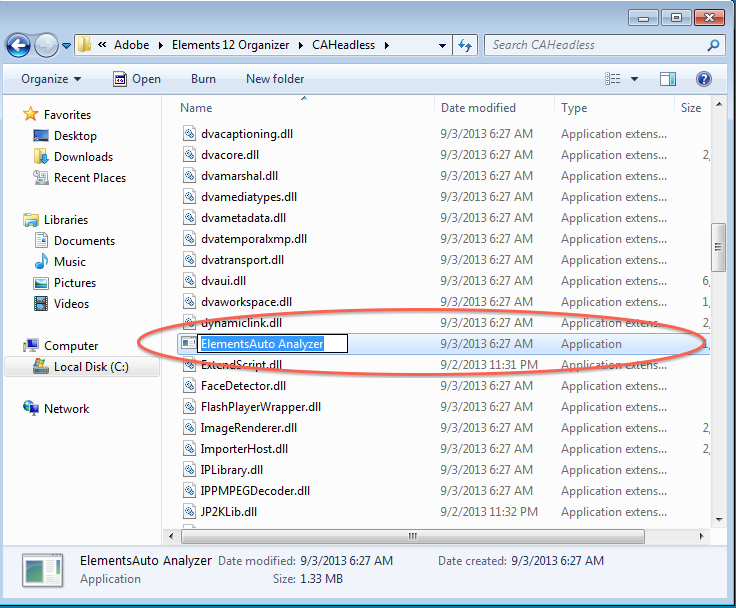
You will need to have hidden file viewing enabled to see the entire path.
The same caution applies here: If you’re going to uninstall PSE, or if you have any trouble after doing this, just go back and remove that space.


